Defining Product Grounding in the Automotive EMC Test Plan
Realistic illustration of car hologram
O

ne of the more overlooked elements of an automotive EMC test plan is defining the grounding for the device under test (DUT) case and its load simulator. These are critical items that will not only affect the test results, but also the test repeatability. Even if the DUT and load simulator have a non-conductive case with no customer grounding installation requirements, this still needs to be defined for the EMC test lab.

Why is Grounding Important?
Military EMC standards historically helped form the basis from which the international automotive EMC standards were developed. From military EMC standard MIL‑STD-461G [1]:
Adequacy of bonding is usually one of the first areas reviewed when platform problems develop. Electrical bonding controls common mode voltages that develop between the equipment enclosures and the ground plane. Voltages potentially affecting the equipment will appear across the bonding interface when RF stresses are applied during susceptibility testing. Voltages will also develop due to internal circuit operation and will contribute to radiated emission profiles. Therefore, it is important that the test setup use actual bonding provisions so that test results are representative of the intended installation.”
Does the DUT Case Need to be Grounded?
The EMC test plan needs to be written with the understanding that the test lab does not know the product to be tested. The DUT description must include how its case is grounded based on customer installation requirements. In the automotive world, the vehicle architecture determines this. The DUT case can have either no connection to vehicle ground or be connected to vehicle ground (either directly or through a metal bracket). Therefore, the customer must be consulted to determine proper DUT case grounding during testing. Some customers may also allow or require a product be tested with its mounting bracket.
Does the Load Simulator Need to be Grounded?
The load simulator is defined in ISO 11452-1 [2] as: “physical device including real and/or simulated peripheral loads which are necessary to ensure DUT nominal and/or representative operation mode.”

Customer requirements typically determine how the load simulator is grounded. The customer may require either a non-conductive plastic or metallic enclosure be used for the load simulator. In some cases, actual loads may be allowed without an enclosure. Actual loads may be a seat motor, parking brake switch, wheel speed sensors, etc. This must be defined in the EMC test plan.

Typical Automotive Industry Standards Grounding Requirements
If the customer does not have defined grounding requirements, then automotive industry standards such as ISO and CISPR may be allowed by the customer.
DUT Case
This DUT case definition below is commonized between the ISO and CISPR standards.
“The DUT shall be placed on a non-conductive, low relative permittivity (dielectric-constant) material (εr ≤ 1,4), at (50 ± 5) mm above the ground plane. The case of the DUT shall not be grounded to the ground plane unless it is intended to simulate the actual vehicle configuration.” [3], [4], [5], [6].
Typically, EMC labs use foam insulation board to meet the non‑conductive, low relative permittivity material requirement.
Load Simulator
This load simulator definition below is commonized between the ISO and CISPR standards.
“Preferably, the load simulator shall be placed directly on the ground plane. If the load simulator has a metallic case, this case shall be bonded to the ground plane. Alternatively, the load simulator may be located adjacent to the ground plane (with the case of the load simulator bonded to the ground plane) or outside of the test chamber, provided the test harness from the DUT passes through an RF boundary bonded to the ground plane.” [3], [4], [5], [6]
Proper Grounding Starts with a Good Bonded Connection
From international automotive standard ISO 11452-1 – General Principles and Terminology [2]:
“Bonded – grounded connection providing the lowest possible impedance (resistance and inductance) connection between two metallic parts with a d.c. resistance which shall not exceed 2,5 mΩ.

Note 1 to entry: A low current (≤100 mA) 4-wire milliohm metre is recommended for this measurement.”

MIL-STD-461G also defines ground potential as 2.5 milliohms or less [1]. As stated in ISO “Note 1 to entry,” this resistance needs to be verified with a milliohm meter (or micro-ohmmeter), not a standard digital multimeter (DMM). A standard DMM can typically only measure resistance as low as 0.1 ohm.
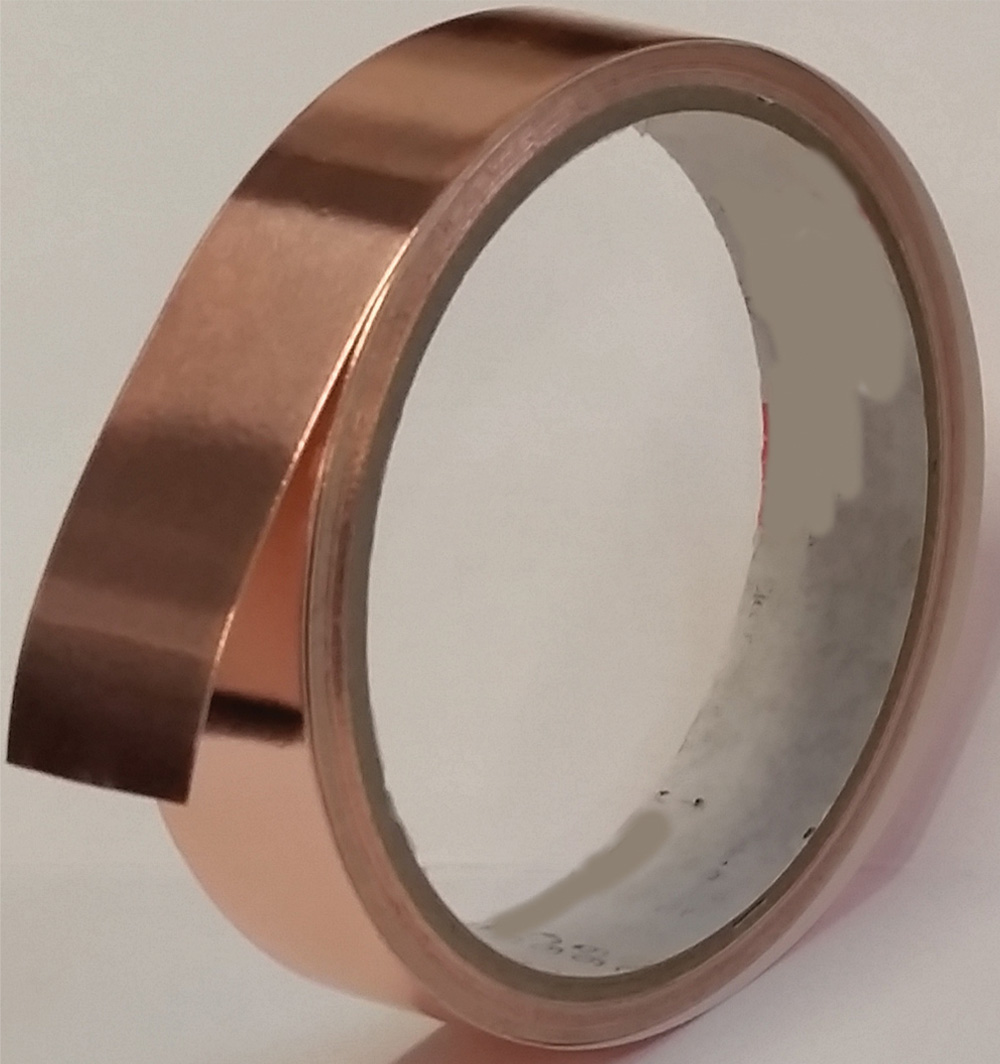
Close view of standard copper tape
Figure 1: Standard copper tape
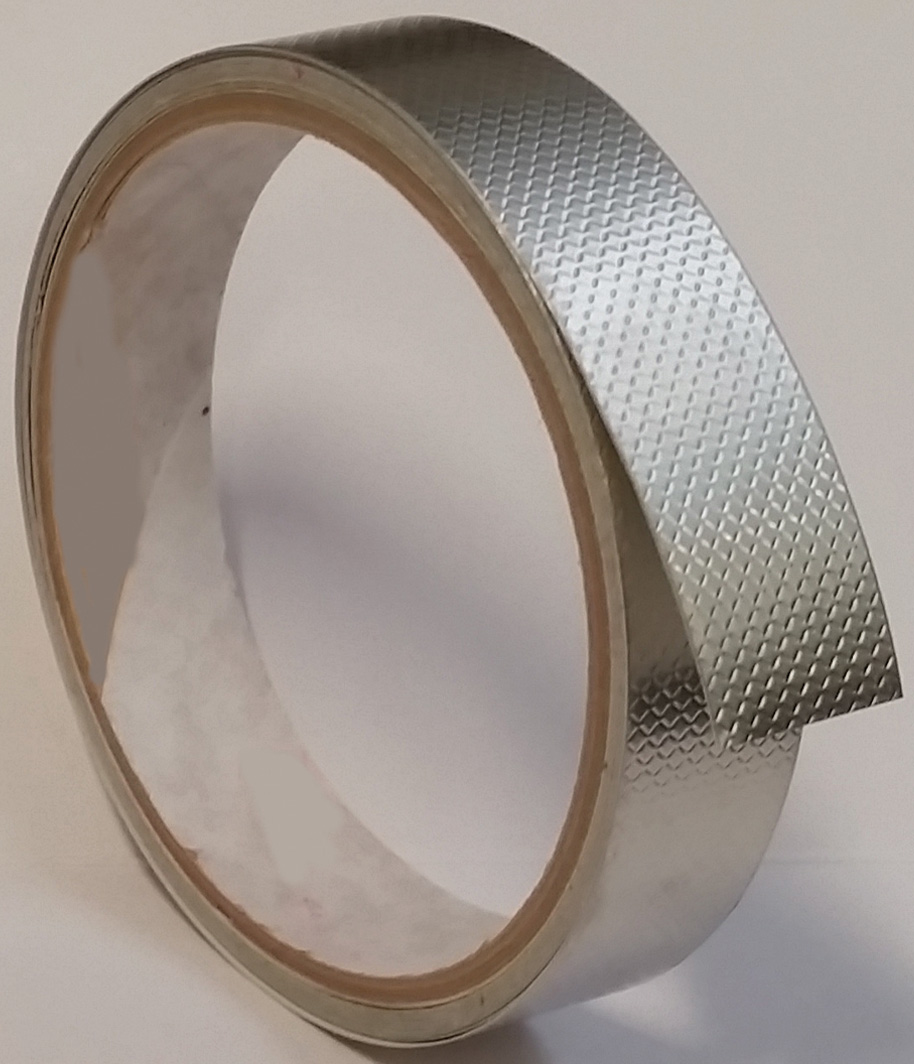
Close view of embossed tin-plated copper tape
Figure 2: Embossed tin-plated copper tape
Grounding Technologies
Copper Tape (if customer allowed)
One type of grounding technology is a flexible copper foil tape with adhesive backing (caution: not all tapes have conductive adhesive). The copper colored tape is the standard used in most EMC labs. However, the embossed tin-plated copper tape (silver colored) has a few advantages over the standard copper tape. The adhesive is pressure sensitive which allows for better contact, and the tin-plating allows for soldering the tape directly to the ground plane and it has better resistance to corrosion.
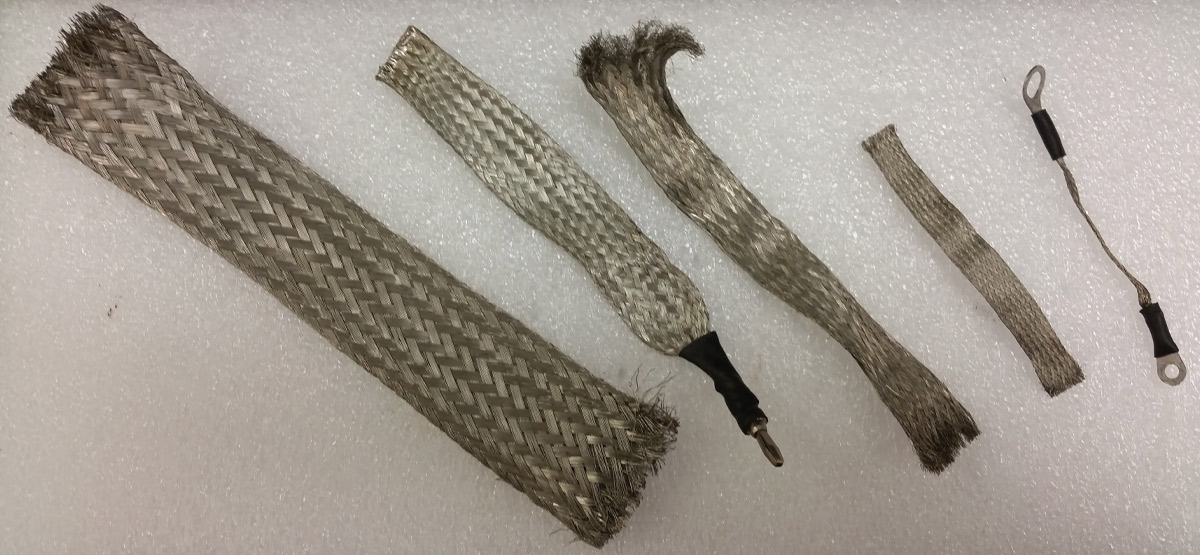
Five worn braided metal straps of different sizes
Figure 3: Braided metal straps found in a typical EMC lab
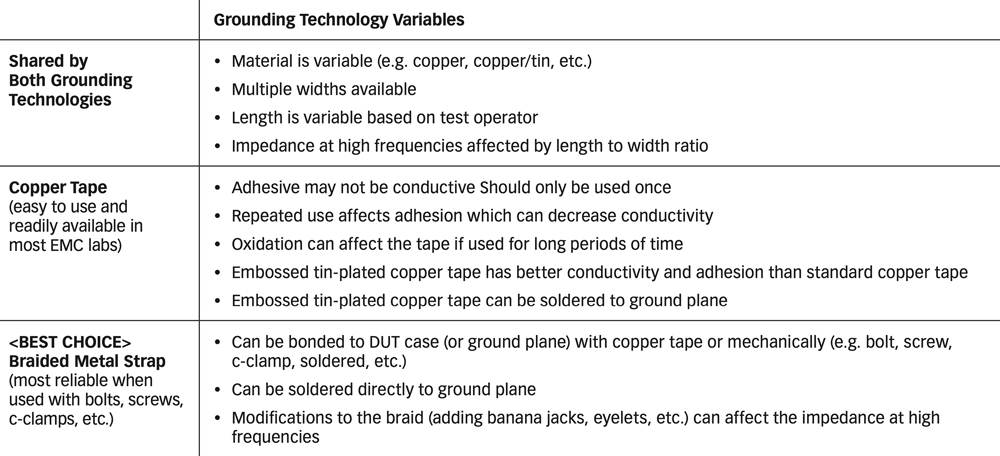
Table listing grounding tech variables by use
Table 1: Grounding technology variables
Braided Metal Strap
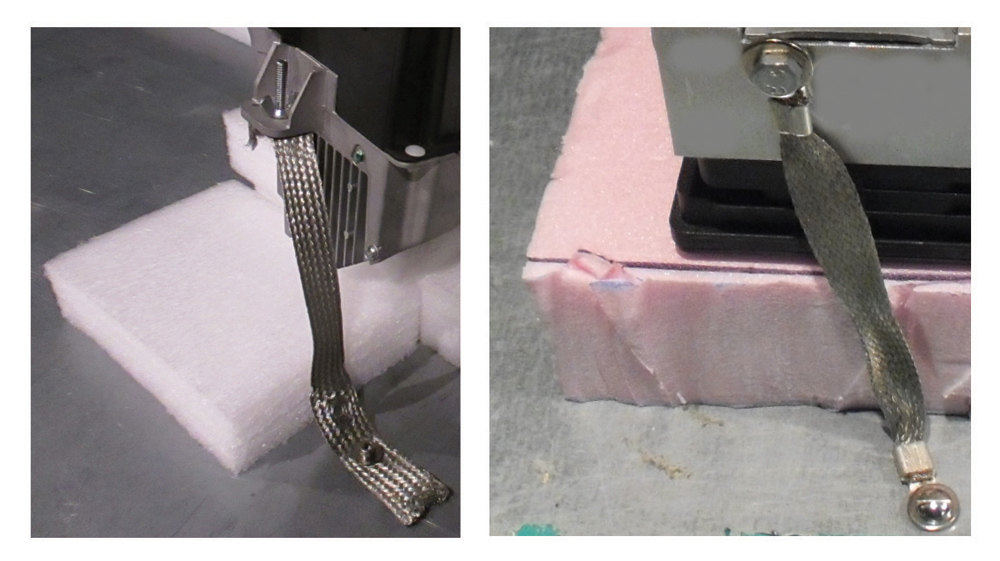
Another type of grounding technology is a bonding strap made from a semi-rigid flat metallic braid/weave that is copper tinned (or untinned). Bonding straps are better than wires since their length to width ratio has lower inductance per unit length. A good practice is to define in the EMC test plan that any ground straps used maintain a “5:1 length to width ratio or less” (recommended in MIL‑STD-464C [7]).

The ground straps shown in Figure 3 are an example of what an EMC test lab may choose for your product if not defined in the EMC test plan. Note, the impedance at high frequencies will be different due to the width, length and addition of connectors (e.g., banana plugs, eyelets, etc.). As shown in Figure 3, the ends of the braid may fray. This can be remedied by soldering the ends of the braid. Also, if adding a hole for a fastener (e.g., bolt, screw, etc.), the edges of the hole should be soldered to prevent fraying. Alternatively, the braid can be soldered directly to the ground plane.

Once it is determined that the DUT case and/or load simulator requires grounding to the ground plane, then the grounding technology variables can be controlled by defining them in the EMC test plan. The 5:1 length to width ratio (or less) is a good guideline to also include in the EMC test plan.

Where and How to Ground the DUT Case?
It is not enough to simply state that the DUT case needs to be grounded. For test repeatability and to avoid misleading test results, where and how to ground the DUT case must be answered in the test plan.
Where to Ground?
“Where to ground” should be clear based on customer installation requirements. In some cases, a customer may require that the DUT be tested as case grounded and ungrounded. An example of this would be an automotive customer that may use the DUT on multiple vehicles with different architectures.

If uncontrolled by the EMC test plan, the EMC test lab will typically use copper tape and place it on the conductive area of the DUT case where most convenient for the test setup. The lab also needs to be notified if the conductive area has a coating that needs to be sanded/removed. Therefore, it should be defined if the DUT case has a mounting foot, threaded hole or other designated area to attach the copper tape/grounding strap.

How to Ground?
“How to ground” is controllable through the EMC test plan. The most common grounding methods are copper tape or braided metal strap. To maintain test repeatability, the grounding method needs to be defined.
Where and How to Ground the Load Simulator?
Fortunately, the “where” and “how” to ground discussion also applies to the load simulator. Just like the DUT, the load simulator needs to have a defined “where to ground” location and “how to ground.” The load simulator can be in a plastic enclosure, metal enclosure or no enclosure depending on customer requirements and DUT needs. The load simulator system may also involve more than one enclosure. Therefore, each enclosure must have its grounding defined in the EMC test plan.
Grounding Methods
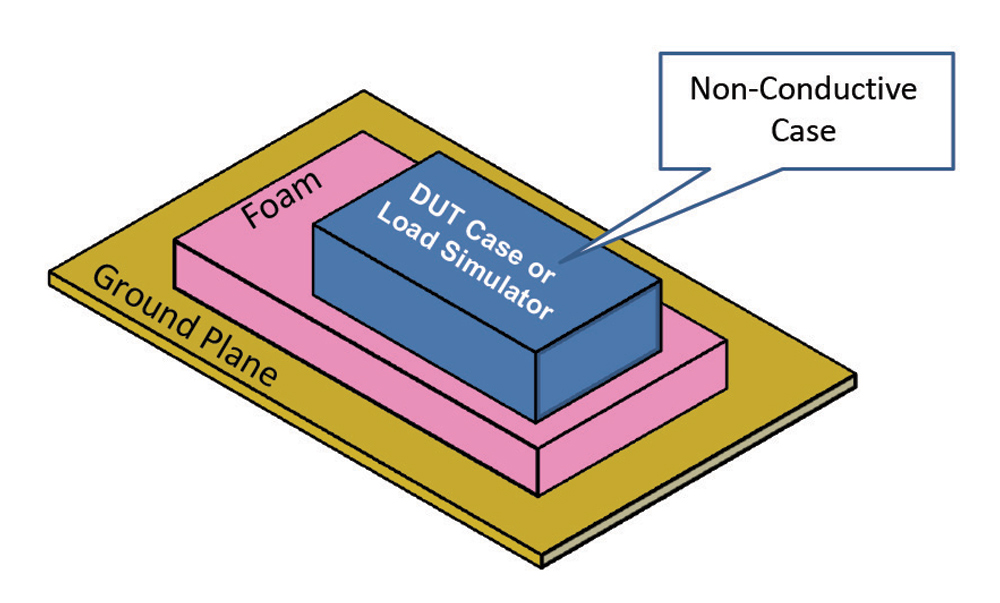
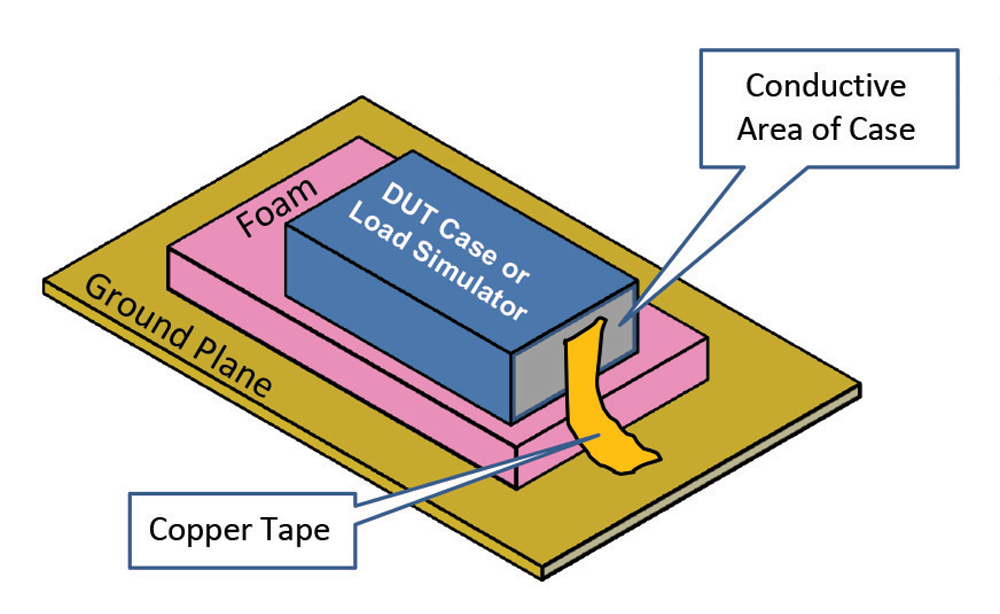
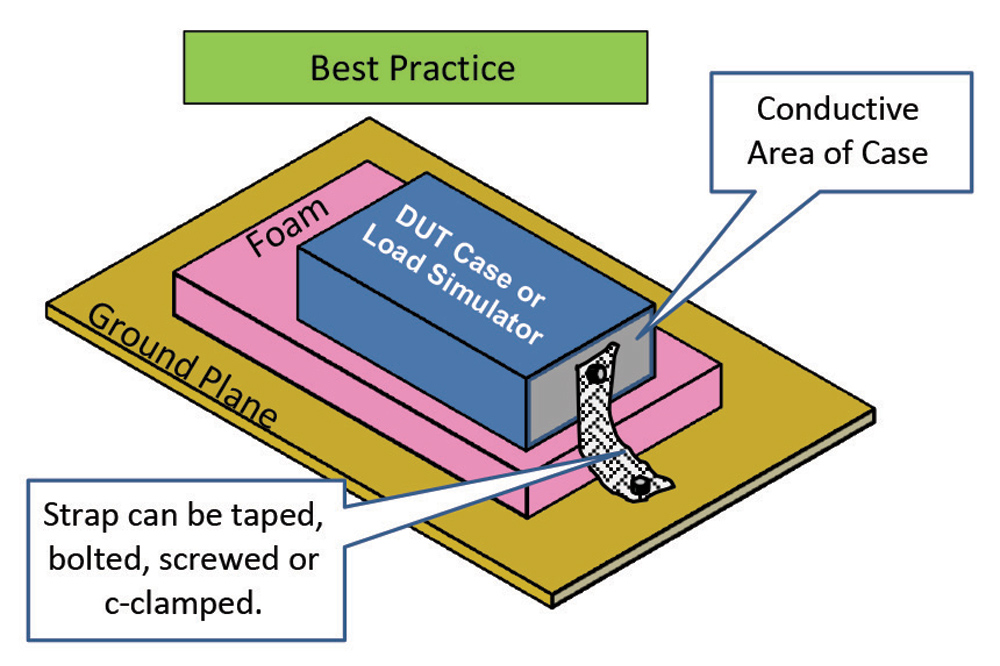
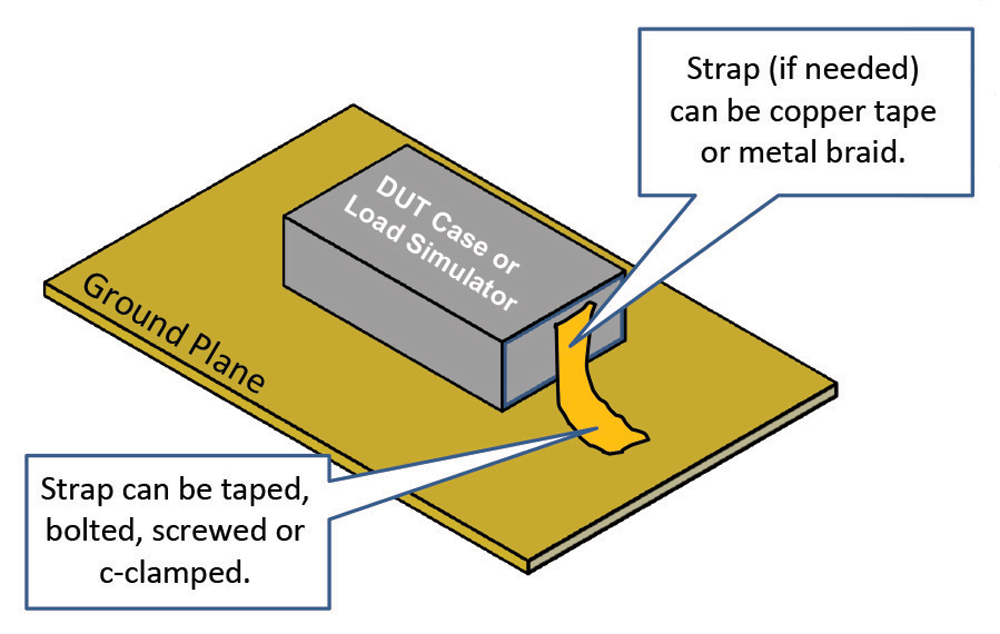
Refer to Figures 4-7 for descriptions of the different “how to ground” methods for the DUT case and/or load simulator.

As shown in Figure 8, there are various combinations of grounding methods and technologies available for the lab to use. When testing is not repeatable or unexpected results are found, one of the first troubleshooting questions asked is: “how was it grounded?”

Illustration depicting load simulator with a non-conductive case isolated from the ground plane on foam
Figure 4: DUT case or load simulator with a non-conductive case isolated from the ground plane on foam.
Illustration depicting load simulator isolated from the ground plane on foam and bonded with copper tape from the conductive area of the case to the ground plane
Figure 5: DUT case or load simulator isolated from the ground plane on foam and bonded with copper tape from the conductive area of the case to the ground plane.
Illustration depicting load simulator isolated from the ground plane on foam and bonded with a metal braided strap from the conductive area of the case to the ground plane. Fastening the strap with a bolt or screw is best
Figure 6: DUT case or load simulator isolated from the ground plane on foam and bonded with a metal braided strap from the conductive area of the case to the ground plane. Fastening the strap with a bolt or screw is best.
Illustration depicting load simulator conductive case placed directly on the ground plane. Can be resting on ground plane or bonded to ground plane using copper tape, metal braid or fasteners
Figure 7: DUT case or load simulator conductive case placed directly on the ground plane. Can be resting on ground plane or bonded to ground plane using copper tape, metal braid or fasteners (e.g., bolts, screws or c-clamp).
What Else?
In addition to defining the grounding in the EMC test plan, what else can be done to provide test repeatability and to prevent misleading test results? Instruct the lab to clean the ground plane prior to grounding. Due to oxidation and tape residue, the ground plane surface may have reduced conductivity. Therefore, require the lab to clean the grounding area with a scrubbing pad or emery cloth sandpaper until the metal is shiny again. Use a cloth or vacuum to remove the fine metal dust, then wipe clean with rubbing alcohol.
Close view of best practice grounding examples with braided metal straps and other materials
Figure 8: Best practice grounding examples
Summary
Know the customer requirements for grounding the DUT case and/or load simulator. Defining the grounding in the EMC test plan for the DUT case and load simulator is an easy insurance policy for maintaining test repeatability between test operators and test labs. Otherwise, test results may be affected which could cause unnecessary repeat testing or misleading results.

The braided metal grounding strap (maintaining the 5:1 length to width ratio) with fasteners
(e.g., bolts, screws, etc.) is the best practice and should be provided to the EMC lab as part of the DUT setup. As an added measure of security, require the EMC test lab to clean the grounding area of the ground plane prior to grounding the DUT case and load simulator.

References
  1. Department of Defense Interface Standard – Requirements for the Control of Electromagnetic Interference Characteristics of Subsystems and Equipment, MIL‑STD‑461G, 11 December 2015.
  2. Road vehicles ‑ Component test methods for electrical disturbances from narrowband radiated electromagnetic energy ‑ Part 1: General principles and terminology, ISO 11452‑1, 2015‑06‑01.
  3. Road vehicles – Component test methods for electrical disturbances from narrowband radiated electromagnetic energy – Part 2: Absorber‑lined shielded enclosure, ISO 11452‑2, 2004‑11‑01.
  4. Road vehicles – Component test methods for electrical disturbances from narrowband radiated electromagnetic energy – Part 4: Harness excitation methods, ISO 11452‑4, 2011‑12‑15.
  5. Road vehicles – Electrical disturbances from conduction and coupling – Part 2: Electrical transient conduction along supply lines only, ISO 7637‑2, 2011‑03‑01.
  6. Vehicles, boats and internal combustion engines – Radio disturbance characteristics – Limits and methods of measurement for the protection of on‑board receivers, CISPR 25, 2016‑10‑27.
  7. Department of Defense Interface Standard – Electromagnetic Environmental Effects Requirements for Systems, MIL‑STD‑464C, 1 December 2010.
Share this story:
Steve Masiak headshot
Steve Masiak is a Senior Staff EMC engineer in the Quality Laboratories division at Continental Automotive Systems. He is recognized by the Continental community as an expert for Test and Lab Procedures (EMC).Masiak has over 20 years of experience in automotive EMC testing and was an ISO 17025 EMC lab quality manager for over 10 years. He is an iNARTE certified EMC engineer, a member of the IEEE EMC Society and a member of the SAE EMC Standards Committee. Masiak can be reached at steve.masiak@continental-corporation.com.